Stories of an accidental morse key collector
I never intended to start a morse code key collection. It just, well, sort of happened that way…
Becoming a ‘ham’
I first looked at the amateur radio exams when I was a boy. I was quite active in electronics and computing, and even remember building my first receiver, winding coils, and wrapping them in a shield made from a baked bean can. But then, well, life got in the way. I didn’t have any mentors at that time, so getting back to radio and getting a license had to wait until I retired…
Why CW?
Well, voice modes never really grabbed me. I’m a bit too much of a hermit for that I think. And then digital modes, well, tbh, there is not enough skill involved there to keep me interested. I spent over 30 years working on embedded computers. Sure, inventing and improving the modes and software is a real challenge, but just running up some software and letting your computer do the chatting is not for me. The only challenge there I could find would be playing with the antennas.
But the, well, CW, by hand. That is a challenge. You need to learn CW (which in my head is somewhere between learning a language and playing a musical instrument), and practice. And then practice some more. Then there is scope to build equipment, play with antennas etc.
I guess I need a key?
At some point I guess I’ll need a key. Not to begin with, as a large chunk of time will be learning the character set and listening (yes, yes, there is always debate about whether you should grab a key early or not - I chose not).
And so the hunt for a key began…
Posts
- J37 No.9 November 08, 2024
- McMurdo MK-1002 minature key December 11, 2022
- Russian/Ukraine LT key July 21, 2022
- A weak solution of citric acid. Keep your eye on this, as it will slowly eat your metal. It is a very easy, effective and cheap solotuion to make up though.
- POR metal prep. This is a phosphoric acid based remover that leaves a mild phosphate coating. I quite like this if the parts are then going to be sat around a bit or then painted, as it leaves a little bit of protection on the part.
- Evapo Rust. This is a mild chelating rust remover, so is kinder and less harmful to the underlying metal. I use this if I have a delicate piece I want to de-rust, which pretty much qualifies for any part of a key :-) This is getting easier to find in the U.K. now I think.
- Czech Army key July 19, 2022
- Czech Army key
- Prijem key
- RM 31 key
- WT 8 Amp June 13, 2022
J37 U.S. army key
Here we have a, well, ‘classic’ - the J37 key. I suspect if you are in the U.S.A. then every CW ham has one or more of these somewhere, or has had in the past. They seem pretty ubiquitous.
They have a good reputation as a nice and sometimes reasonably cheap key. Apparently not as cheap as they were in days gone by, but still potentially good value.
I had a J37 on my list of keys to try. As it happened in 2022 a U.K. ham had acquired a bunch of keys and was disposing of them. I secured a J37 for £30, delivered.
Note, although this post is dated November 2024, I actually cleaned up and mounted the key back in August 2023 - just somewhat behind on updating my posts!
The key
Well, it turns out they key I got is slightly unusual. If you look closely you can see the trunnion adjusters are on the inside of the pivots, whereas normally you will find them on the outside. This makes the key somewhat narrower, and it would seem that this is likely a J37 key from a Key and Plug Assembly No. 9.
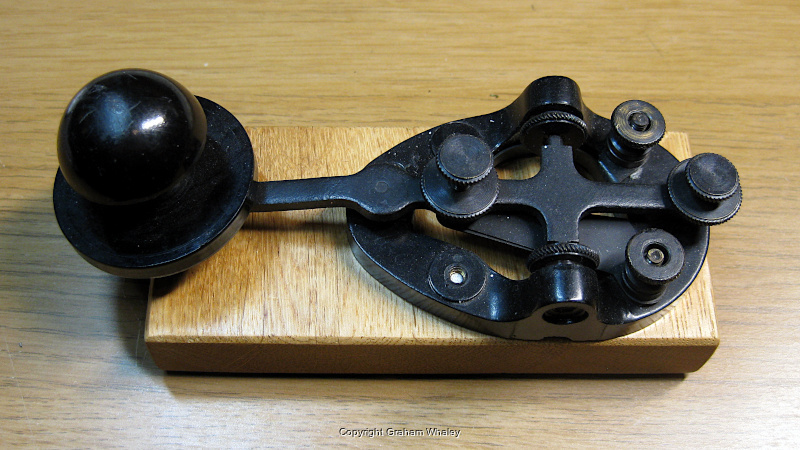
The other thing you’ll notice is a much more european style grip with a rouded knob and a skirt, unlike most J37’s that have just a simple flat knob.
How did it come
The key came unmounted, and pretty clean. It had a little bit of dust on it, and a touch of grime on the skirt, but other than that, pretty pristine.
It’s not a complex key. The mechanics are relativley simple, and there are only so many things that could go wrong. One interesting subtle thing about how the key works electrically. The key I have is ‘all black’ - pretty much every last bit of it (which seems unusual for a No.9 variant…) - but, if you look very closely you can see that there is a tiny spot that is not painted on the end of the spring, and a matching tiny bit on the bottom of the tension screw. That’s because they form a critical part of the electrical path, passing the current into the armature, so it can make contact with the bottom contact upon closure. Subtle if you don’t know that is how it is working…
I will note here, I’m not sure if the key was originally all black or if that has been done later on by a previous owner. Most of it looks original, but all black No.9’s don’t seem common.
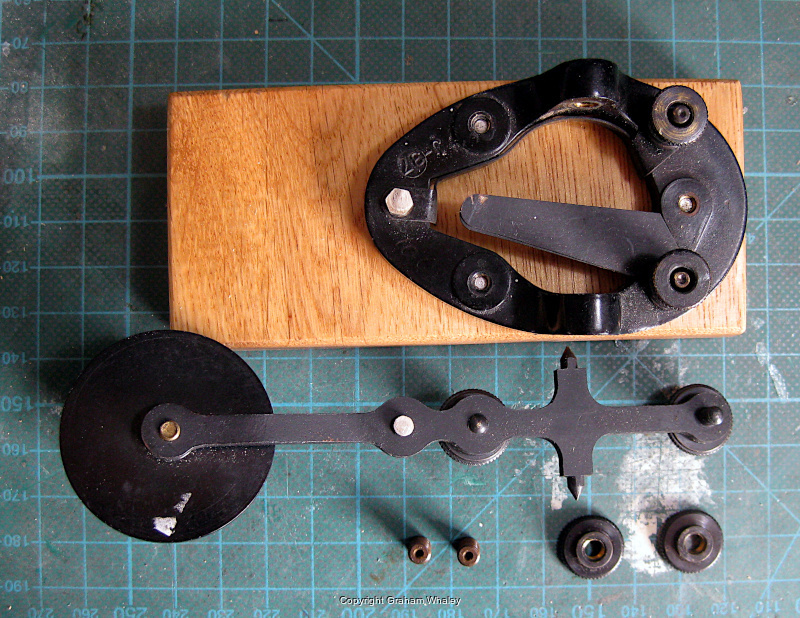
Cleaning up
Well, the key didn’t need much cleanup at all. There was a little bit of dust and a tiny bit of grime on the knob, but apart from that the only part I cleaned up were the pivot points, wiping down the points on the edges of the main beam and using a sharpened stick and some paper sprayed with solvent to clean out the divots in the end of the adjustment screws.
How does it operate?
I have to admit, I suspect I have not given this key as much of a workout as I perhaps should. It has an easy action that is not too hard, but I think the base I have mounted it on is a little too small, too light and the felt feet are slightly slippy and soft. To really do the key justice I should remount it on a heavier more stable base… let’s see if I find time (but, tbh, there are other keys in the queue I really want to try out first…).
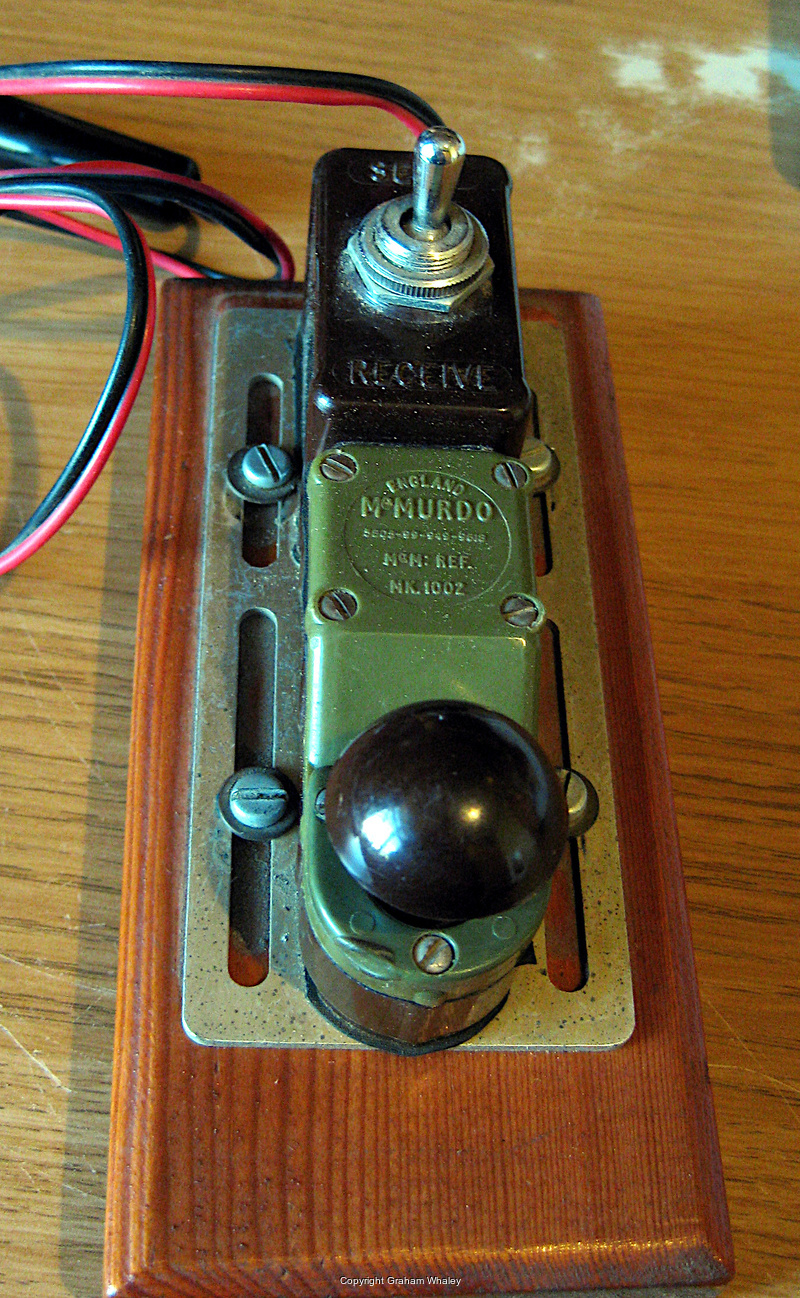
McMurdo minature MK.1002 key
The key
Picked up from the usual auction site on 16/1/22 for £19.70. At the time I was (and still am) contemplating and planning for some portable operations one day - and this key looked like it could be a great candidate - small, rugged, dust sealed.
Background
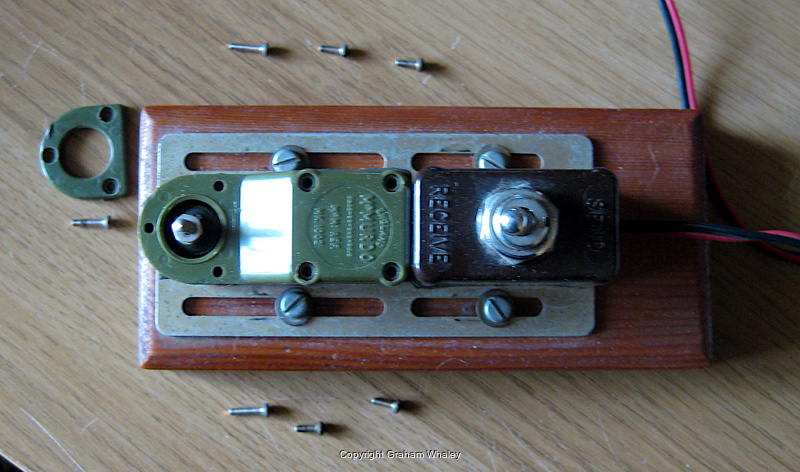
There doesn’t seem to be a huge amount of information on these keys out there on the internet. They do seem to come under a few different names from a few different manufacturers, such as the ‘BCE 502’, C307 as well as McMurdo 1002.
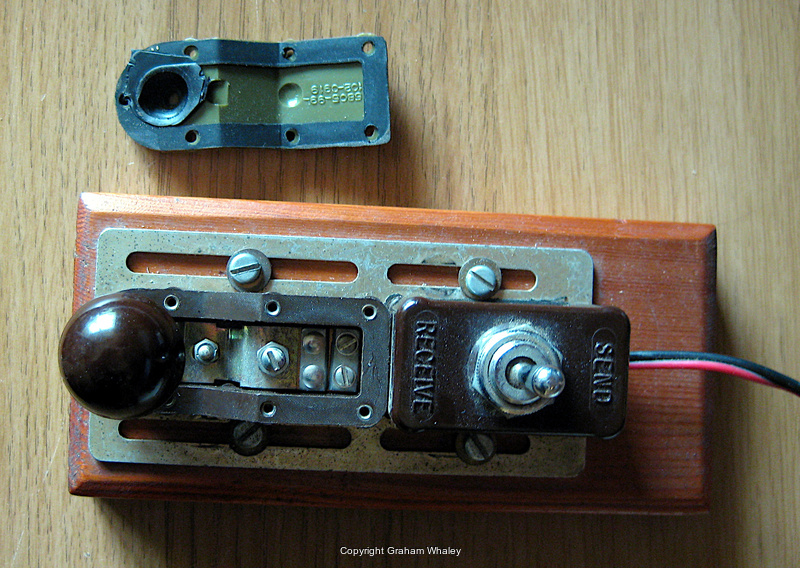
My key seems slightly unusual in that it has a longer metal base with an extra ‘tx/rx’ switch attached. This does very much look like an original part, but most of the pictures on the internet don’t have this.
Reading around, this key looks like it was combined with Racal radio sets, and is designed as dust and waterproof, and was even used on liferafts?
How did it come
The key came pretty clean. Well, hopefully being water and dust proof, you’d sort of hope that had done its job. The cable into the switch though was not sealed, so there goes the proofing for the rx/tx switch. As usual, I tested the key with the multimeter - hmm, a dead short. Not a great start. So, now, how do we take apart a sealed key? At first I tried to get in via the top of the key, but that only got me so far (see later). After unmounting the key from the wooden base and flipping it over, there were a few screws looking promising. After removing the screws it became apparent that the rubber gasket was partly welded to the case. That may be by design, or it might just be through age. With some very gentle prying (I didn’t want to have to re-make the gasket later if necessary), I got it apart. Voila!, we can now see inside both the switch and the key.
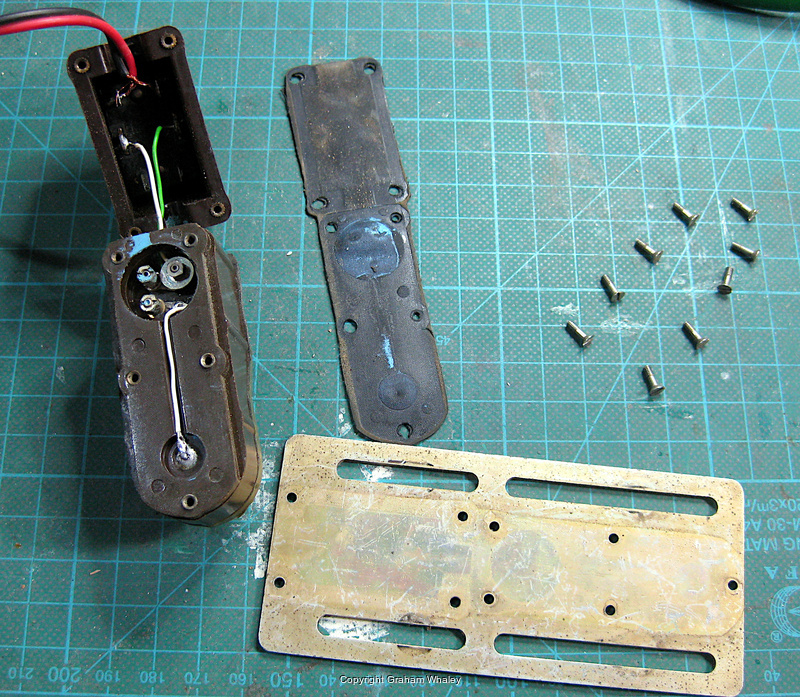
Hmm, now, let me see - can we see anything obvious that might be causing that short!!
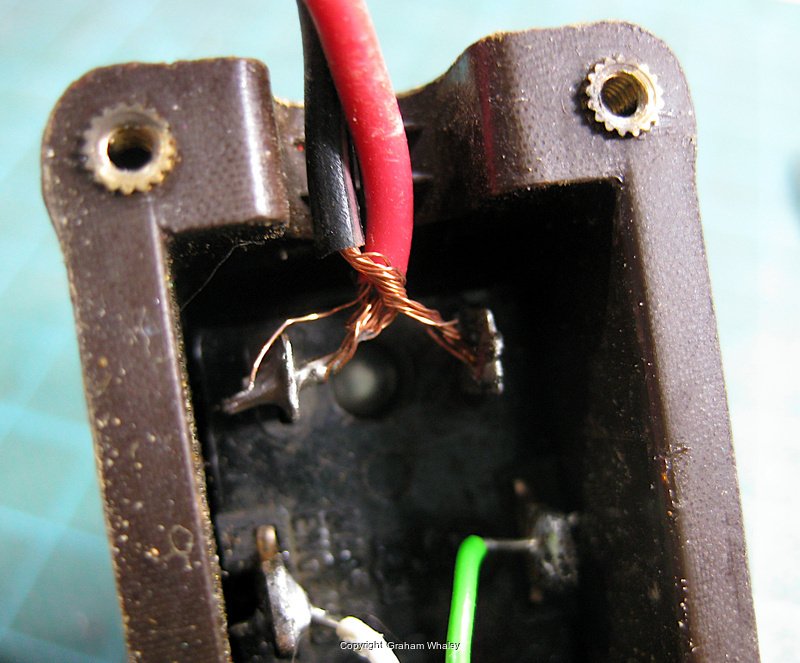
Out with the soldering iron and on with the re-wiring… that’s better, now the key is functional!
Adjusting
The key came with quite a long and stiff stroke. Some of the internet references say this key is not adjustable. Well, that is true from an external daily point of view. But, what about inside the key? Here we go again then - this time we really need to get the top open. Now we understand that the gaskets have welded themselves on, we can be a little braver…
There is a strange arrangement with an extra little plastic ‘spacer’ on the front of the key. Also, note, there are different length screws. It is not too hard to figure out which go where on re-assembly, but taking digital photos during disassembly is a cheap backup when disassembling things…
Now, if we gently prise around that upper gasket, finally we get inside… note, in this picture I have re-attached the knob so I can adjust tension and gap. Also note the interesting rubber gasket that sits around the knob post - we’ll get to that in a moment.
Now we can see there are two adjusters - a smaller one at the front with a nut on a post, and a larger screw post at the back with a locking nut. Frustratingly, I have forgotten which one is the gap and which is the tension, and I can find no notes on it! But, rest assured, they are gap and tension adjusters, and I did adjust my key.
Now, a word of caution - you need to adjust the key when it is open, but once you put it back together that little rubber seal that sits around the knob stem adds some more stiffness to the key! So, you may wish to adjust the key to be a fraction soft on the grounds that the grommet will stiffen it up a little when you re-assemble it. A pain I know, but as far as I can tell, unavoidable.
How does it operate?
I’ve not taken this key on the air yet!, and I probably need to open it up again and make further adjustments to cater for that rubber seal. My key is still currently a little stiff, and has a very short travel. The stiffness may always be present due to the seal. As a tiny potentially POTA or SOTA key, I think it has great potential - tiny, dust and waterproof! The key is pretty quiet to operate, being completely contained, but is still slightly louder than I though - I have a feeling it is currently resonating through the wooden base!
Russian/Ukranian LT key
As published in the FISTS CW Club December 2022 Key Note newsletter
I picked this key up on 19/6/21 for £23.95 off the usual internet auction site. There are a number of variants of this key around, notionally made in either Russia or Ukraine. It is not always obvious how to tell them apart. There is also the variation that some units come with a noise filter built into an extended base (and are quite often postfixed with the letter ‘F’ to indicate this), and some don’t.
The key
Here is my key as it came:
If we look a little way down this brundrit page, it says that the Ukrainian keys have a ‘3TA’ logo embossed on the lid, and the Russian ones have ‘LT’. Mine has an ‘LT’, so notionally this is a Russian made key.
Mine does not have the base filter unit. It is also possibly slightly unusual in that the main armature is painted black. I’m not sure I’ve seen another one with a painted armature in any internet photos. The paint looks pretty ‘original’ to me.
There is a touch more info on the Ukrainian keys on this morsex page. Those keys do look a little different to mine - the top lid has a diffrent embossing, and there look to be some insulating washers or something on the adjustment screws that are not on mine. That does make me feel maybe mine is more Russin than Ukrainian.
You’ll also see these keys called ‘TK’ or ‘TKF’. I’ve not managed to quite track down where that name comes from. Here is the eham review page.
Clean it up
My key came with some corrosion. It was not terrible, but it was pretty wide spread, being on all the screws and armature parts. The main painted armature was not too bad. It needed a complete strip down:
Given the extent of the corrosion, I decided a gentle rust removing ‘dip’ was in order. I have a number of ‘dips’ I use, including:
Once cleaned up and put back together, the key looks like:
Adjusting the contacts
One interesting thing I found when putting this key back together that I’d not seen documented anywhere before is that you can adjust the contact alignment. That is, the horizontal alignment to ensure the contacts are touching middle-to-middle. This is pretty easy to do, as the bottom contact is a loose fit in its hole in the base. Just slacken off the retaining nut a little and you can manoeuvre that contact into alignment, and then re-tighten the nut.
Here is a picture of my contacts as they came, out of alignment:

How does it operate?
I’ve not had much time on this key, but generally I like the feel. It’s a little soft, and not too clacky, and is fairly quiet as the mechanism is enclosed in its casing. I think I need to do some more gap and tension adjustments, but overall I’m happy with this key.
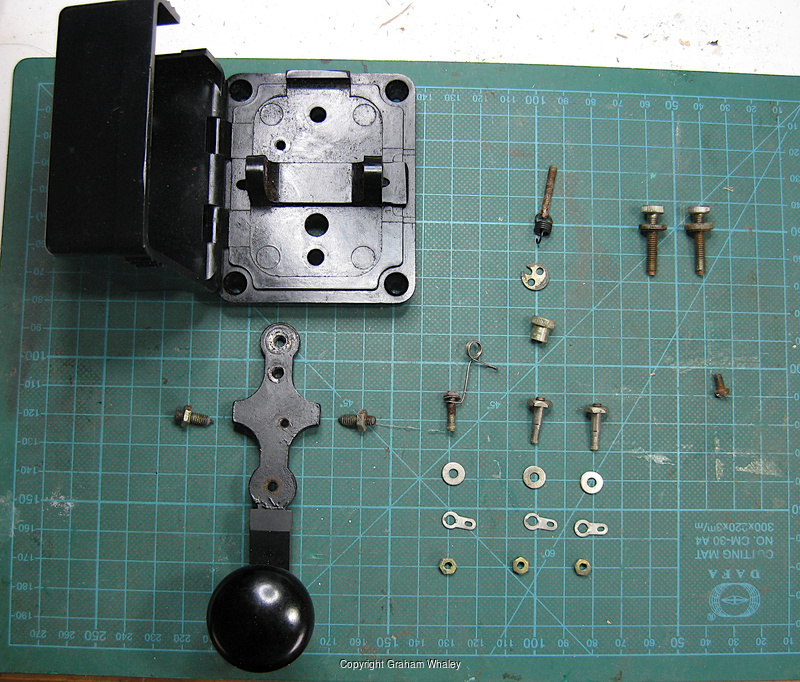
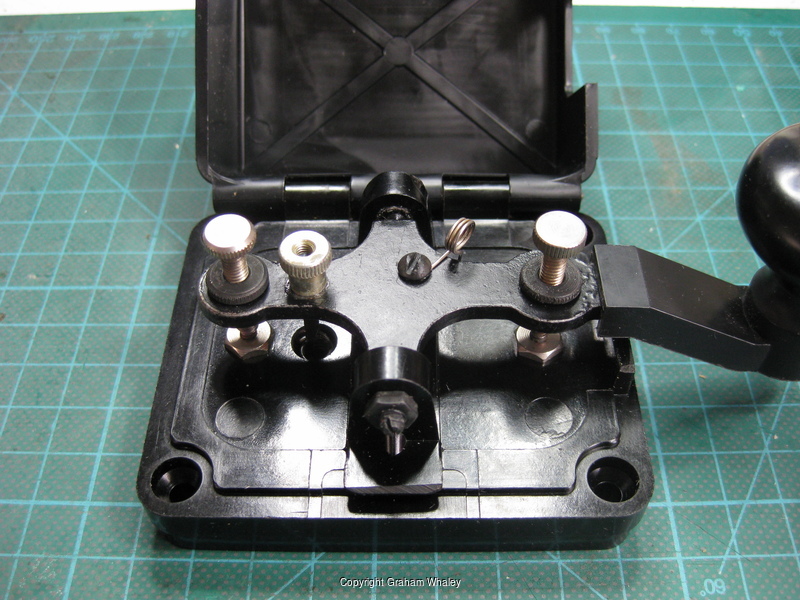
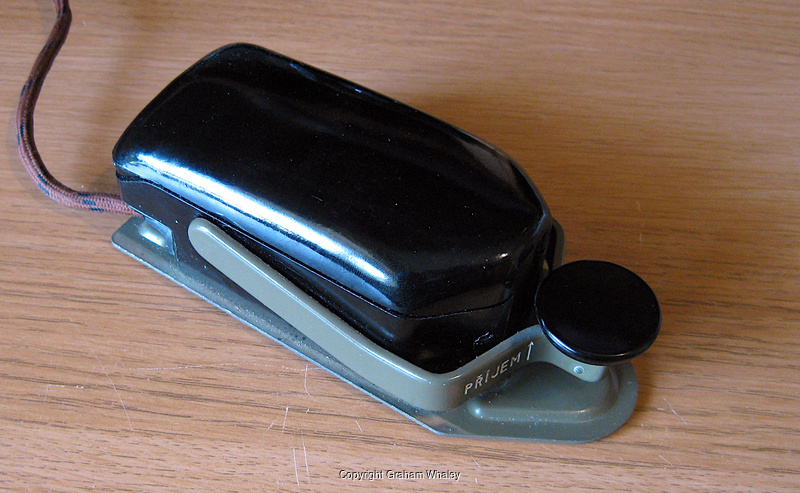
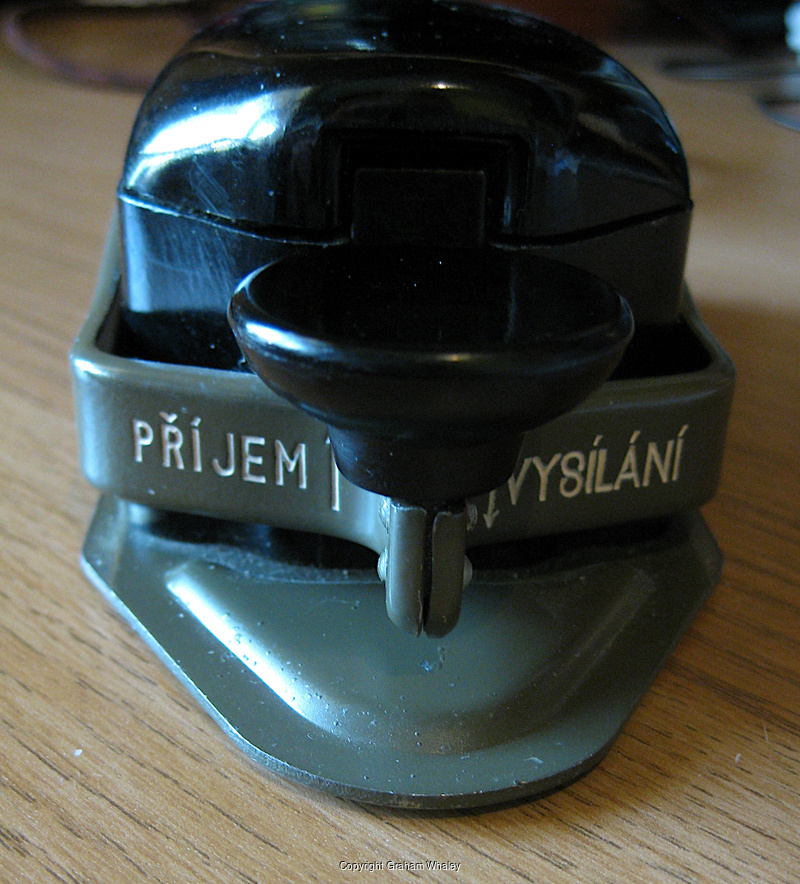
Czech army key
After my first key, the WT8AMP, I wanted to see if I could find a ‘softer’ key. I also felt I needed to try some other keys anyhow.
After some research the Czech army key was recommended in a number of places as a good value purchase for a beginner. I started the search, and soon one turned up…
I acquired this key from ebay, for the sum of £14.09 delivered. That was a real bargain! These keys do still turn up in pretty good condition on ebay, hovering around the £30+ mark from what I see. If I see one turn up cheap-ish, I’ll probably snap up another.
I should clarify that you might see this key descriped under a number of different names. Being called a ‘Czech’ key is probably the defining common, but other than that, the key itself does not appear to have a serial number or type imprinted on it, and thus possibly the multitude of names it is listed under. They include afaict:
The name ‘Prijem’ comes from that word being printed on the front of the main key arm, along with the word ‘Vysilani’. They mean ‘receive’ and ‘transmit’ in Czech !. Yes, if you lift the keying arm up then there is an extra switch inside the key body that you can use I believe!.
RM31 seems to actually be the name of a transmitter the key was used with, and not the key itself - maybe.
One of the best pages to find more information is from the UV3R sellers site. Although all the keys are sold out, there is a lot of useful information there.
There used to be a UK reseller as well afaict, but with supplies of these NOS keys dried (that is, now I think you can only really get them second hand), those web pages appear to have deceased.
There are some nice photos on this PA3EGH page including the original wax paper wrapper. You can also see the optional leg strap and how the key slides into it. My key didn’t come with a leg strap.
You can read the eham reviews here. The one negative review I can see complains about the action being mushy - but, well, for me right now I sort of like that.
The key
There are plenty of pictures in the above links, but here is my key:
The internals are interesting - this key seems to use a different mechanical action to most key designs, which I think contributes to its action.
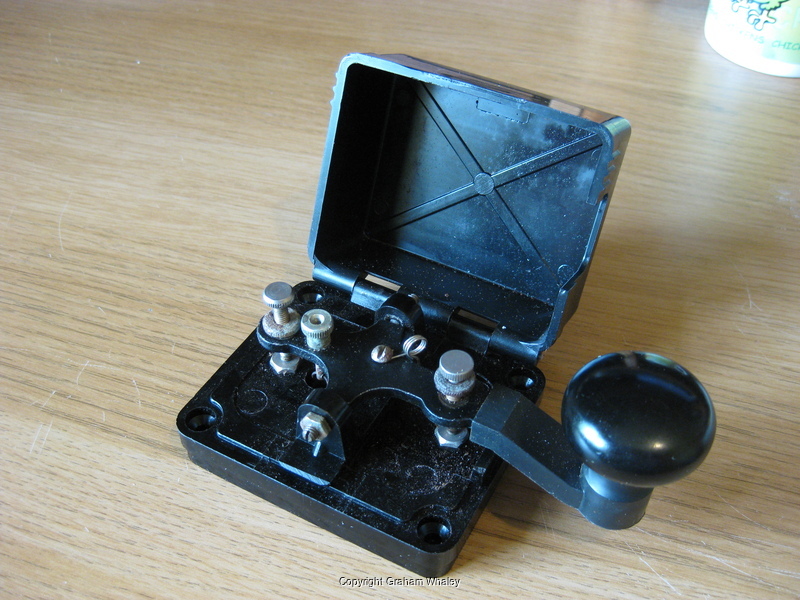
As you can see, the key comes enclosed in a case that seals with an o-ring - these keys probably classify as ‘flame proof’. That also helps reduce noise during use.
If you want to open the case, push the key arm up, and then depress the little lever/button you find under it - and then flip the lid up. For me this takes a bit of finger twiddling as the arm tries to squash the finger lifting the lid, but it works.
Opening the case also disconnects the key I believe - another ‘flameproof’ safety feature.
You can see the adjusters for gap and tension there as well. And that big spring - iirc, it is not so much the tension spring, but it places a constant tension on the arm bearings, thus removing any play.
Cleaning up
Well, my key pretty much came as new. No cleaning up required at all. It even came with a 3.5mm plug on it. I stuck some very small rubber feet on the bottom (those little buffers you get for kitchen cupboard doors, of which I had some laying around), and adjusted the gap and tension to my liking. Voila!
How does it operate?
I like this key. I like the action. As of right now this is the key I’m using for my practice. I have some other keys I also like, but until I get those nicely cleaned up and mounted for a fair comparison, then this is the key wired to my practice TRX.
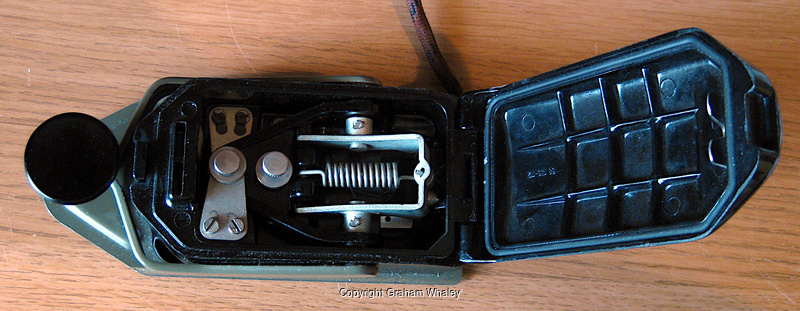
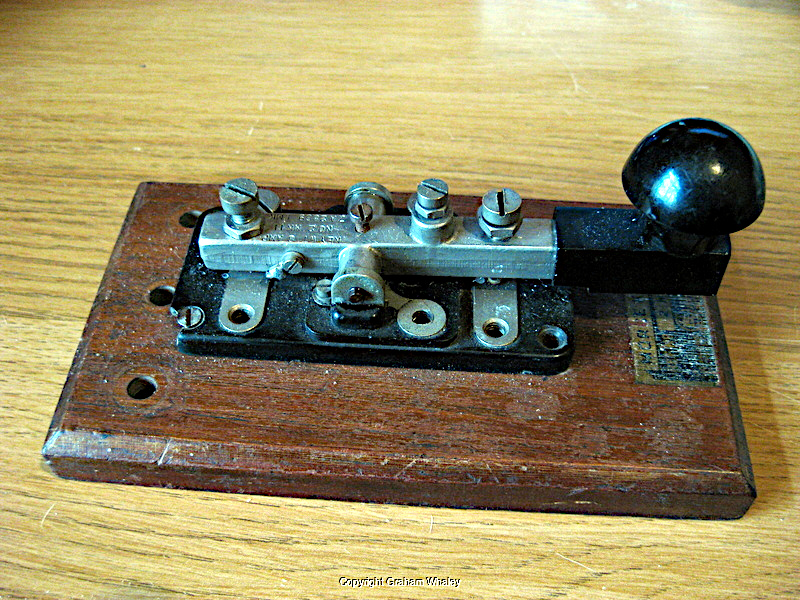
WT 8 Amp key
My first key! Well, I had to start somewhere. I had limited knowledge about morse keys, and didn’t want to blow the budget on a first unknown key, so was looking for something nice, well made (not junk), but at a reasonable (that is, cheap!) price. I know, I know, that would normally be a ‘pick any three’ scenario. I was hoping to trade off on looks and win on price and functionality.
I ended up with a WT 8 AMP as my first purchase.
The key
The WT 8 AMP is fairly ubiquitous. There are many of them, and many styles of them. A good reference is the summary from the Morsum Magnificat magazine. In particulary, the WT 8 Amp reprints PDF has 57 pages of probably everything you could ever want to know about the WT 8 AMP key family.
The WT 8 AMP was a mainstay key of WWII. Literally millions were manufactured.
My specific key is a No.2 MKII ZA 2869 LMK. Looking at the Morsum reference above, it is likely the key was manufactured between 1940 and 1942.
How did it come
I purchased my key off ebay in November 2020. I paid the princely sum of £14, delivered. The key was mounted on a base (see later), was a touch grubby, had one corner of the base broken, but generally was in useable shape:
It was a bit stiff - the spring return was slow, like it was gummed up. A look at the pivot pin showed it had some mild corrosion around the ends.
The base is interesting, in that it is a morse key base, but not for a WT 8 AMP. After some mild cleaning and staring, I worked out it is a base for a Signalling Equipment Ltd. No. 2.N.P key.
Oh, and one corner of the bakerlite base of the key has fractured off. Not the end of the world. In some ways that is a win for me, as slight damage that does not affect performance can mean I get a key cheap. I’m really not looking for a pristine key, as long as it is fully functional. And I rather enjoy cleaning and fixing them up.
Cleaning up
First things first then - this key needs a clean. If nothing else we need to check out that corroded pivot pin. Let’s get it apart.
Taking this WT8 apart is not too hard. Pretty much undo the screw that is retaining the pivot pin, and push the pin out. Here you can then see the state of the key. It’s not terrible, but there is an accumulation of crud around the pivots, and the pin itself could do with a clean.
The pivot pin was a bit stiff to remove - I seem to remember I took off some of the corrosion on the very ends of the pin before pushing it through the pivot blocks and armature - no point forcing rust through those holes if you don’t need to.
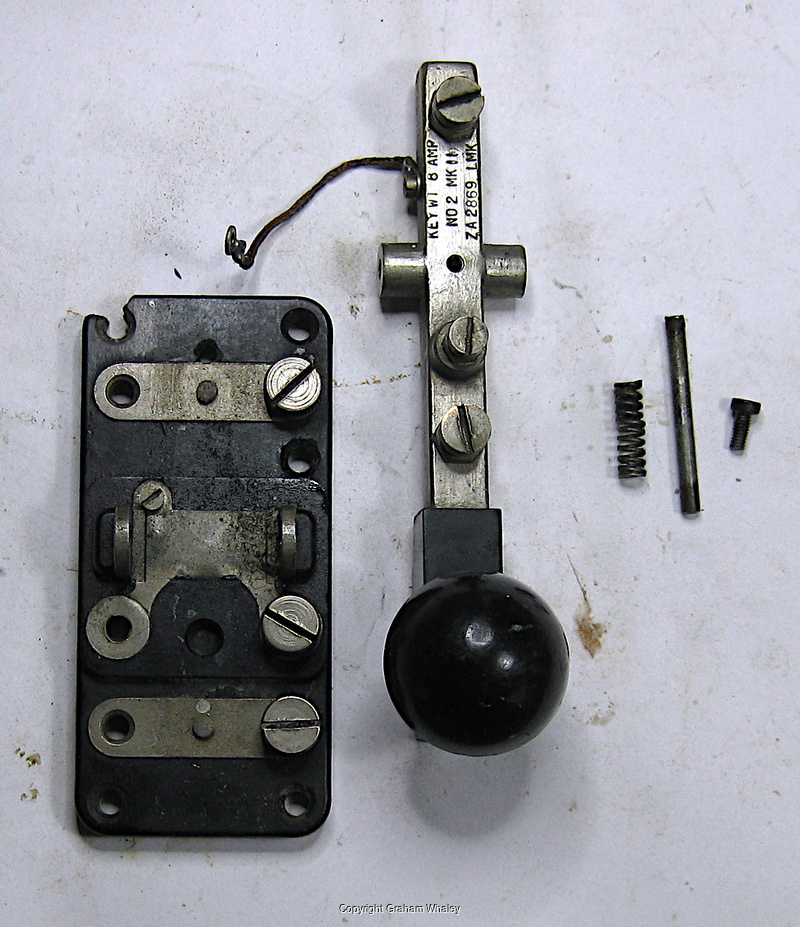
Mostly I cleaned this with some mild soap and an old toothbrush. If I remeber rightly, I then used something like a garryflex block to clean up the pivot pin, and some mild metal polish to clean up the metal parts.
Now, what to do about that broken corner on the base. I resorted to my goto ‘gap filler’, epoxy putty. I used some milliput ‘standard’, as that is what I had to hand. I have since purchased a multi-pack of various colours of milliput, so would have used the black milliput if I had had it to hand.
Mix, apply, and once cured carefully file and sand it to shape.
Putting it back together is as easy as getting it apart. The pivot pin now slid into the pivot holes much easier than it came out, and didn’t have too much play.
Here is the cleaned up key, mounted on a new oak base. The screws I used have heads just a fraction larger than I’d like, and sit slightly proud, but they are what I had to hand. I had to be careful with that repaired corner, and in fact there is a slight crack opening up caused by the screwhead, but it is still functional.

How does it operate?
Well, this being my first key, I didn’t really have a lot to compare it against. Since acquiring more keys though, my first impressions have been borne out - this key is quite ‘clacky’ - that is, loud, and has quite a hard stop. That’s not really to my liking. I can live with the noise if I have to, but the hard stop doesn’t feel nice to me. I gather as one gains experience then you might be able to transmit faster with a ‘hard’ key, but I’m just staring out, and want to try out some other keys to see if all keys feel like this or not…
Still, I’d say the key is not looking too bad for something probably 80 years old! As a first key, I’m pretty happy with it.